Monthly Archives: May 2009

Everything at once.

Not sure if there is a point in counting the days anymore. Even without pipes the organ made it’s public debut on the weekend. Saturday It was shown at the MBSI Ardenwood meeting. Where there was a nice table on the side porch to display the work in progress.

I forgot the camera, however several others did manage to take some photographs. These may be sent to the MMD for publication.

Several friends stopped by Ardenwood, Including Russ Doering, who gave me some pipe wood. I think the scrap from these pipes were used to make the pump and regulators.

Sunday was an eventful day. I wanted to be in three places at the same time. Two of the events were close together, So the organ first went to the AMICA meeting, Hosted by Bob Gonzales in Marin. I then stopped by for the last hour at the Shoenstein open House in Benicia.

My experiment to locate a time machine sometime in the future, seems to have failed, So I was not able to attend the second day at Ardenwood. Even so I was fortunate to attend two event happening at the same time.

It was not my intention to take the organ into the Shoenstien factory, as they were showing off a rather nice large organ, and a much smaller one. Mentioning I had the organ in the car with me, I was invited by the owner Jack Bethards to bring the organ inside and show it. Jack is good friends with Russ. Probably the wood pipes I made the wind pumps and reservoir passed through Shoenstien at some time.

This makes the little one week wonder as I have been calling it a success in that many of the people who indirectly helped collaborate on it, got to see the results first hand.

While showing the instrument to a visitor at Ardenwood, I noted that the wood used was made from found scraps of wood. I was real pleased when they remarked that the organ was “green.” as this was the point of the project.

After the Shoenstien Open house, a few friends of Harold, who made the crankshaft and roll mechanism, also in the same week, had a nice dinner to wind down from a Hectic weekend.

It was also nice to see some of the same people, both days at different events. This means I was not the only one multiplexing everything at once.

Aldo Laus at Mell Wright’s excellent busker site estimated that it should take 54 working hours to make the 650 or so parts at 5 minutes per part. This is way over optimistic. I spent about 16 hours a day for 8 days which works out to 128 hours. A lot more than the typical normal 40 hours allotted for work. Aldo estimates, that there are about 290 or so parts not counting the pipes. Many of these parts took more than an hour to layout measure, check and measure again, before cutting.

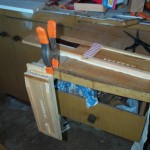
I think I was wise to start with the bellows, as having built and recovered a number of singing bird bellows, I find the valves on these items to be tricky. The valves do need time to settle in.

I did not make the roll mechanism as this was done by Harold the project instigator. I suspect Harold spent more than 5 minutes on the parts he made.

This week will be spent making and voicing the pipes. I am not aware of any public events in the near future, Probably just as well as I will not have such an artificial deadline to deal with. I will admit that I had fun with this project. One of my former co-workers at Shoenstein, asked me if it was a Joke. I think they were correct in a way. That there was humor intended in setting out to do the nearly impossible task of making a quality product in a week.

Not that the final product was a joke, but the desire to do it in a week, was a bit tongue in cheek at first. Then developed into something serious.

Day 7, everything but the pipes.

Technically, the parts for this organ were made in a week give or take a few days.

Making the pipes was saved for the last task. Debugging the pumps, took more effort than expected. The valve design chosen was the alternative one. The valve leather I had left over from another project has been stored rolled up. This needs to lie flat for awhile. When the pump sticks were connected, the valves did not fully seat and the back pressure blew out the side of one of the feeders.

At least the check valve flaps are easily accessible. Holes were drilled where the corner tacks pass through the material. This allows the leather to lie relaxed on the valve seat.

another issue was that the releaf valve was not centered on the hole. Once these issues were corrected the system pumps a steady 4 inches of wind.

dcp_2967

By the time the pumps were working, It was too late to cut the wood for the pipe sides. The wood has been re-sawed into thin sheets. These need to be cut into rectangles, starting with the largest pipes in the group.

dcp_2969

As for the player unit, My friend Harold, who got me started on this project, Is making some of the needed items, such as the spool holder, and idler clutch assembly. These will be ready in the morning. So I plan to attend the MBSI event and at least show what can be done in a week.

If there is time, some pipes may be made for the events on Sunday. The nice thing about this project is that even if it could not be done in a week, It will get done, and be a nice addition to the collection.

Day 6, too close to call.

At the end of a long day. Progress is not quite where I would have liked it to have been. This may still happen. I have 24 hours left, which accounting for a few hours of sleep probably gives 17 or 18 hours in which to get something playing.

ideally I would have the bellows pumping wind so the pipes can be made and voiced quickly. Instead, I was able to get the roll player section completed first. Mostly due to help from my friend Harold.

I decided before it got too dark, to saw up some more of the local wood. The band saw blade was dull, while cutting through a piece of the pear wood, the blade broke. I am pushing this saw to the limit. re-sawing the thick slabs of cherry is hard on this tool. Hopefully I can get a new blade in the morning.

Without a working band saw, I am unable to finish the pump sticks. Fortunately I had planned to do some of the gasketing after 9pm. Even though this is a semi-rural area, the sound does carry at night. Although as I was performing the leather work, I could hear a train which was a mile away quite clearly.

dcp_2964 
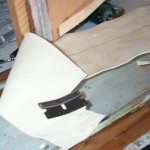
This is an interesting way of making a gasket. I am not sure if this is the best place for this method, but it seems worth a try. This is how Wurlitzer gaskets the regulators to the wind trunks.

First a strip of felt is glued down the center of the frame. Then gasket leather is glued on ether side of the felt. It is important not to get glue on the top of the felt. The only packing leather I have is thick. I think what I used is some extra pouch leather I got for making Wurlitzer valves. Once we get pump sticks and the wind line drilled, then perhaps It will be seen if this works.

dcp_2965 
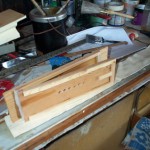
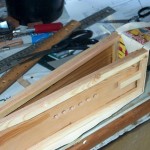
Finally we show the progress. All the main parts are in place and mounted to the sides. I did get a sheet of MDF for the pipe rack. Not sure when I will have time to cut it. I may just mount the pipes onto thin strips of board (I have a lot of that material.)

It will be interesting to see if this can be made playable in time for the event Saturday. Much of the detail, like the sanding and finishing of the cherry sides will not happen. The most critical part that needs to be fitted is the supply spool holder. This got delayed as a 10mm drill was needed. Not sure where the time to make this will happen.

Probably allowing for a week+ 2 days of preparation for this project was a bit optimistic. On the other hand, without the self imposed deadline, It is easy to defer many of the tasks. The important thing is the challenge of what can be done.

It should also be noted, that while the goal was to do the project in a week, the project has had the help of several people. Which is the focus on why this project has been selected, so it can be shared with whomever is interested.

Of course, the deadline of the 16th of May 2009 is artificial. Undoubtedly there will be improvements. Music will need to be acquired, spools made. Thee knob of the handle turned. The case varnished and decorated.

My late friend John Grass, used to say, the first part to make was the hardest one. So with this project I have at least started something.

Day 5, build an organ in a week

All the major parts are completed.

No photographs as I forgot to take the camera out to the workshop.

Harold made the spools and the drive wheel for the take up.

The plastic tubing was acquired.

To save time the top of the pressure box will be a single sheet of plastic.

Optimistically I wanted the bellows and pressure box connected by the end of the day. This did not happen. A few bearing blocks need to be made along with the pump sticks. Having everything else ready to assemble should make for an interesting day tomorrow. It will probably be another long day.

Day 4, Pressure box assembly

dcp_2962
Progress at the end of the day.

The sides of the pressure box have been accurately drilled by first cutting the boards oversize, then gluing the edges together with hot glue. This glue strip is cut away after the holes are drilled.

When using Foresner bits, the large hole is drilled first. The the small hole. The cut-out for the tubes was cut with a hole saw. The waste for this will be used for the idler wheel.

dcp_2963

The sides of the pressure box were cut using an inexpensive laser line level on a radial arm saw. This makes a precisely true cut. Shown in the second photograph is one of the case sides after planing in preparation for cutting square.

The pressure box was joined using what I think are called dado groves. This is the way Wurlitzer makes wind tight boxes. The internal frame of the bellows were also joined in this style. The laser line was also used to set these groves true.

Once all the sides are cut, they have been clamped against the small square I use for layout.

The next stage of the project will be completing the outside case and connecting the bellows and reservoir for pressure testing.

Day 3 – Make a busker organ in a week.

As Sunday was a bit of a holiday, I did not have time to update the blog. There was time to drill the valve holes then cut and fit the valve leather.

Day 3, Monday was busy covering the bellows with leather.  An alternative method of covering the bellows is shown in the gallery of today’s images.  A click on the image below should display the steps I used to cover the bellows.

While I was working on the bellows.  My friend, who made the tracker bar, made a crankshaft for this organ.

The next step will be to construct the pressure box.  The wood for the pressure box  and the case sides is made from scraps of cherry, which are glued with carpenters glue and under clamps for the night.   The next goal is to get this assembled and the bellows installed for testing.

One week busker organ is green, with wood grown in garden

Green busker

Green busker

Having completed my part in wiring a 15 rank Wurlitzer theater organ,  I wanted to make something small.  In addition to wiring the Theater organ, I also leathered most of the primary valves and much of the percussion.  This project has occupied the bulk of my time three days a week for six months.

A new goal is to have a small busker  organ playing in one week, by May 16 2009.  This was prompted by a friend making me the tracker bar out of an aluminum block as per the design of John Smith, of England.

Since I had to make some replacement pneumatics for the Wurlizer xylophone, I decided to start the busker with the bellows assembly.   Compared to covering the percussion pnuematics and the swell shade pnuematics and bumpers, the bellows are not much different.  With only three units to cover, most of the time is spent on the preparation work

When I made the Caliola,  The pipes were constructed with extra thick walls which were sawed down then planed true.  This left me with a number of 6.35mm to impossibly thin 2mm sheets of pine.  The thicker sheets were joined using a router table,  glued up and planed to 1/4 inch (6.35mm) these are now the bellows feeders and pressure box.

More importantly some time ago, a small pear tree was cut down.  This tree was an off shoot sapling from a parent tree, which did not produce tasty fruit.  It did make pears which were a bit tough.   This tree was split in half for quarter sawing while still green.  The wood has been aged some time.  The tree was somewhere around 20 to 30 years old  about 2 inches (50mm) across.  These fruit trees grow slowly and are quite dense, which makes pear a premium wood.    The languids and the caps of the pipes will be made from this wood.

A Monterrey pine tree was also trimmed a few years ago.  Some of this wood was milled for later use.  This wood will now be used for the fronts of the smaller pipes visible on the front of the instrument.

I also have a large collection of short  2 inch thick blocks of cherry wood. This has been re-sawed for gluing up to make the sides of the case and the pressure box.   By making the bellows, pressure box and case first, The pipes can be set to wind as they are constructed.

There is an estimate online that it should take 52 hours to build one of these organs.  So far about 16 hours have been spent  on the setup.

-julie